RailMind guide
How to use RailMind
From an empty screen to a closed Kato loop in two minutes, then everything else, one short section at a time.
Written for RailMind 1.2
Stuck? Ask us.
Email us and we’ll help you get going. Tell us your app version, your iPad model and what you tried.
1. Build your first loop in 2 minutes
You’ll lay a real Kato oval of ten pieces and close it. Nothing here needs a purchase.
- Open RailMind. The logo animates while it starts; tap anywhere to skip it. A four-page tour follows: swipe or tap Next, or tap Skip at the top right. The last button reads Start planning. The tour shows only once, but you can replay it.
-
On the Start with a demo screen, tap any card to get your own editable copy of that layout (the original stays put), or tap Start from scratch at the bottom for an empty plan.
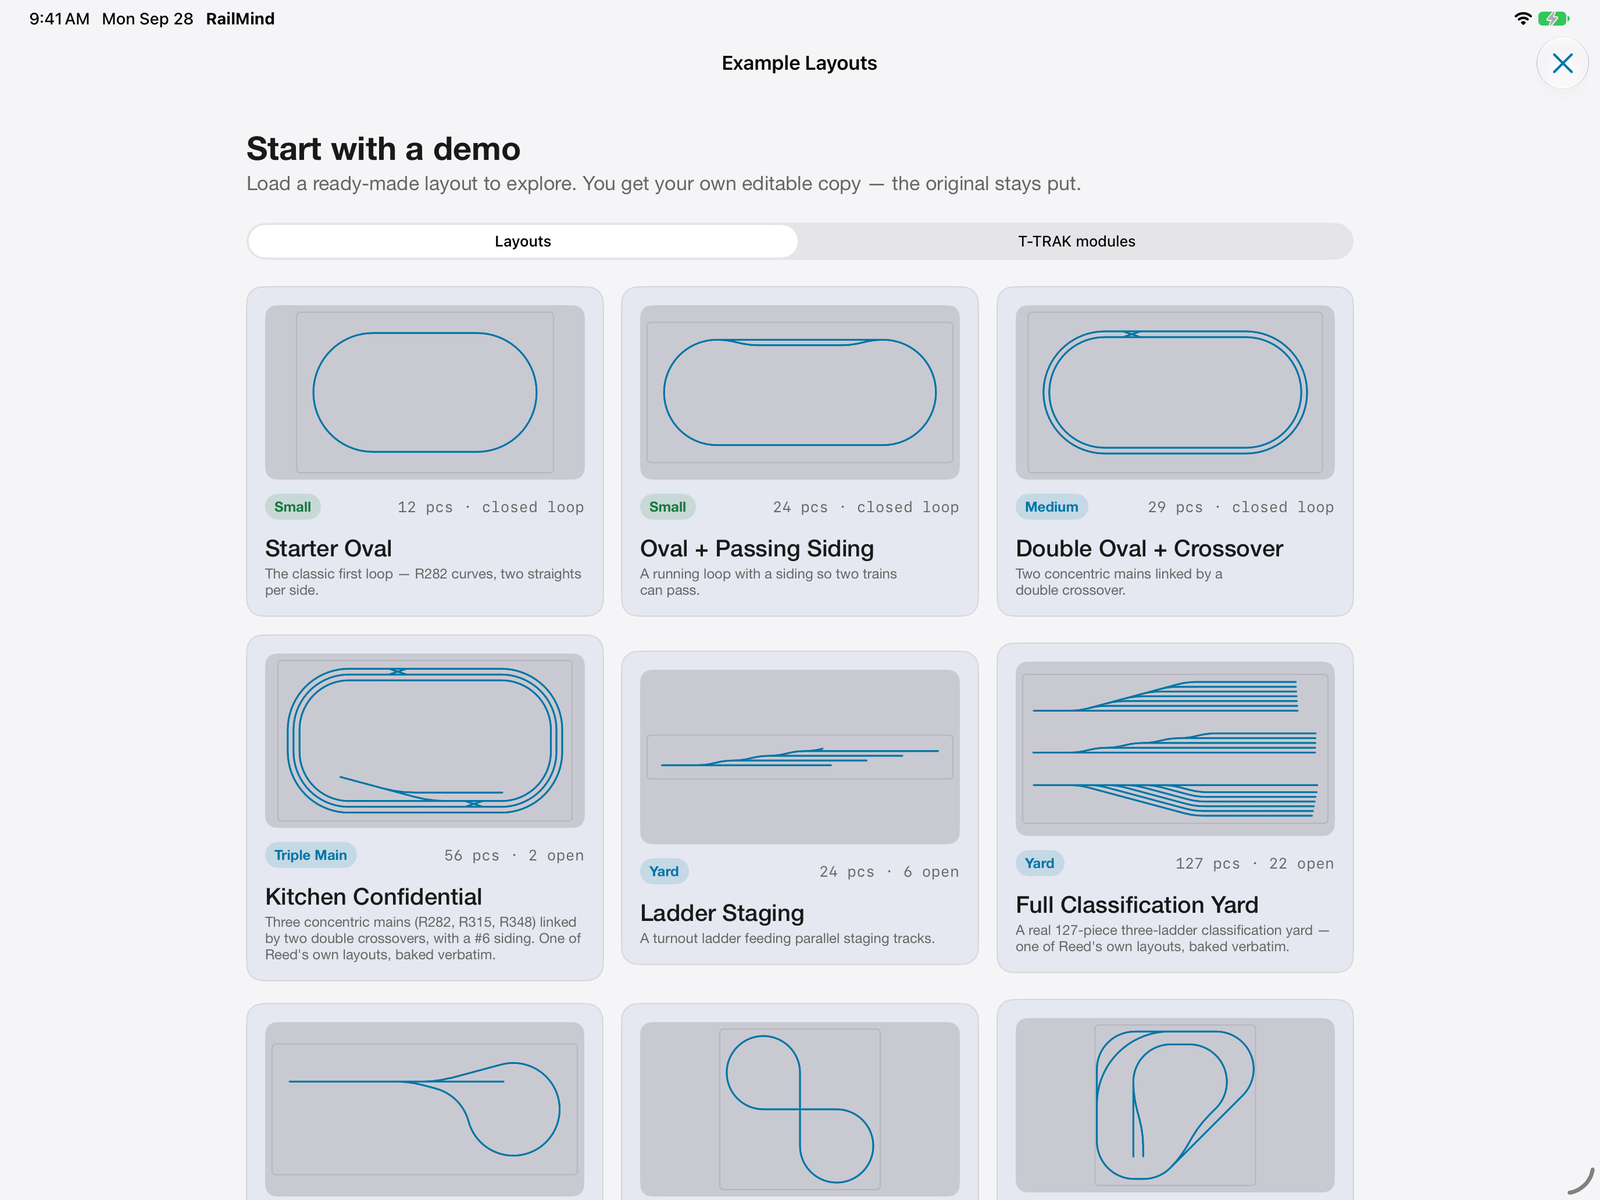
Pick a ready-made layout, or scroll to the bottom of the list and tap Start from scratch. -
Start from scratch opens the Layout sheet. If you build in HO, set Scale to HO scale at the top first, because it locks once the plan has track. Then scroll down to Add your first board, tap a size (for example 4 × 8 ft) and tap Done.
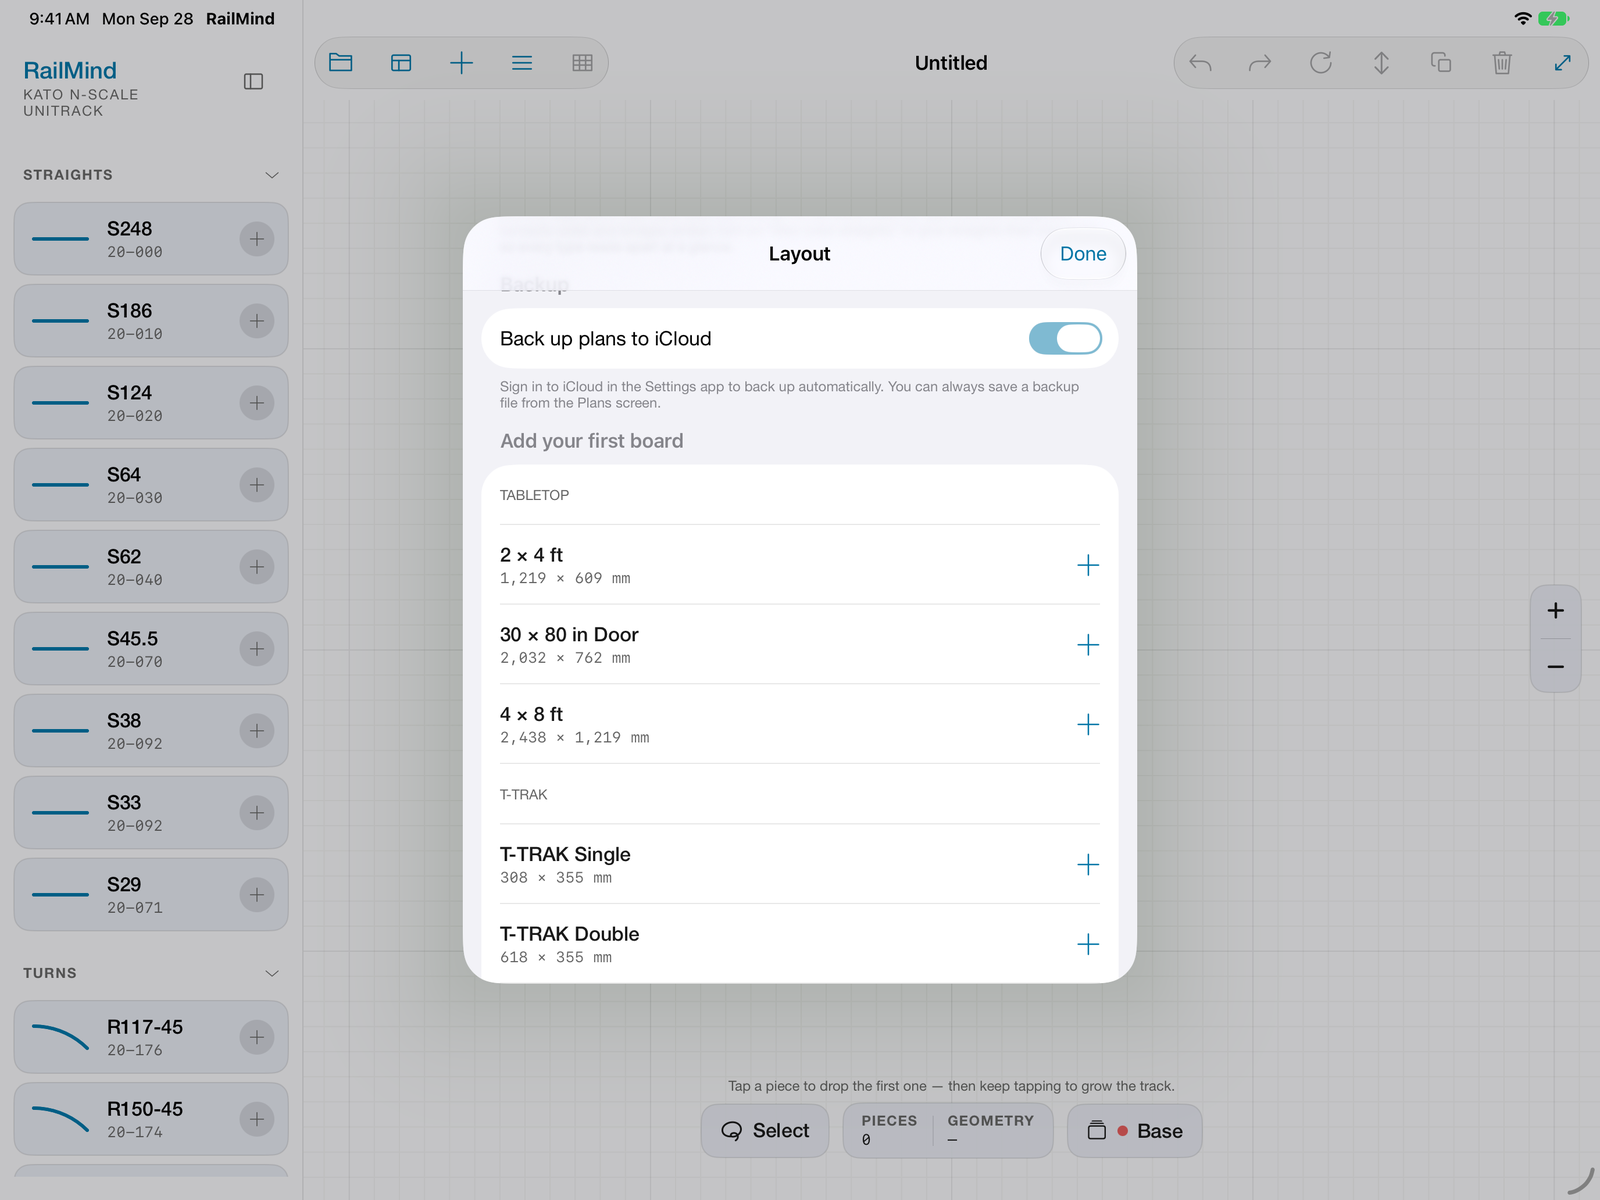
Scroll down the Layout sheet to Add your first board. Tip Later on, the + (Add Baseboard) button in the toolbar is the faster way to add a board.
- Tap a piece in the palette on the left. It lands in the middle of your board. Keep tapping: each new piece joins the glowing blue end of the track.
-
Try it: tap R282-45 (Kato 20-110) four times, S248 (20-000) once, then R282-45 four more times. A green Close loop button appears at the bottom, and a dashed green preview shows the piece it will add. Tap it, and GEOMETRY reads Closed. That’s ten pieces: eight R282 curves and two S248 straights.
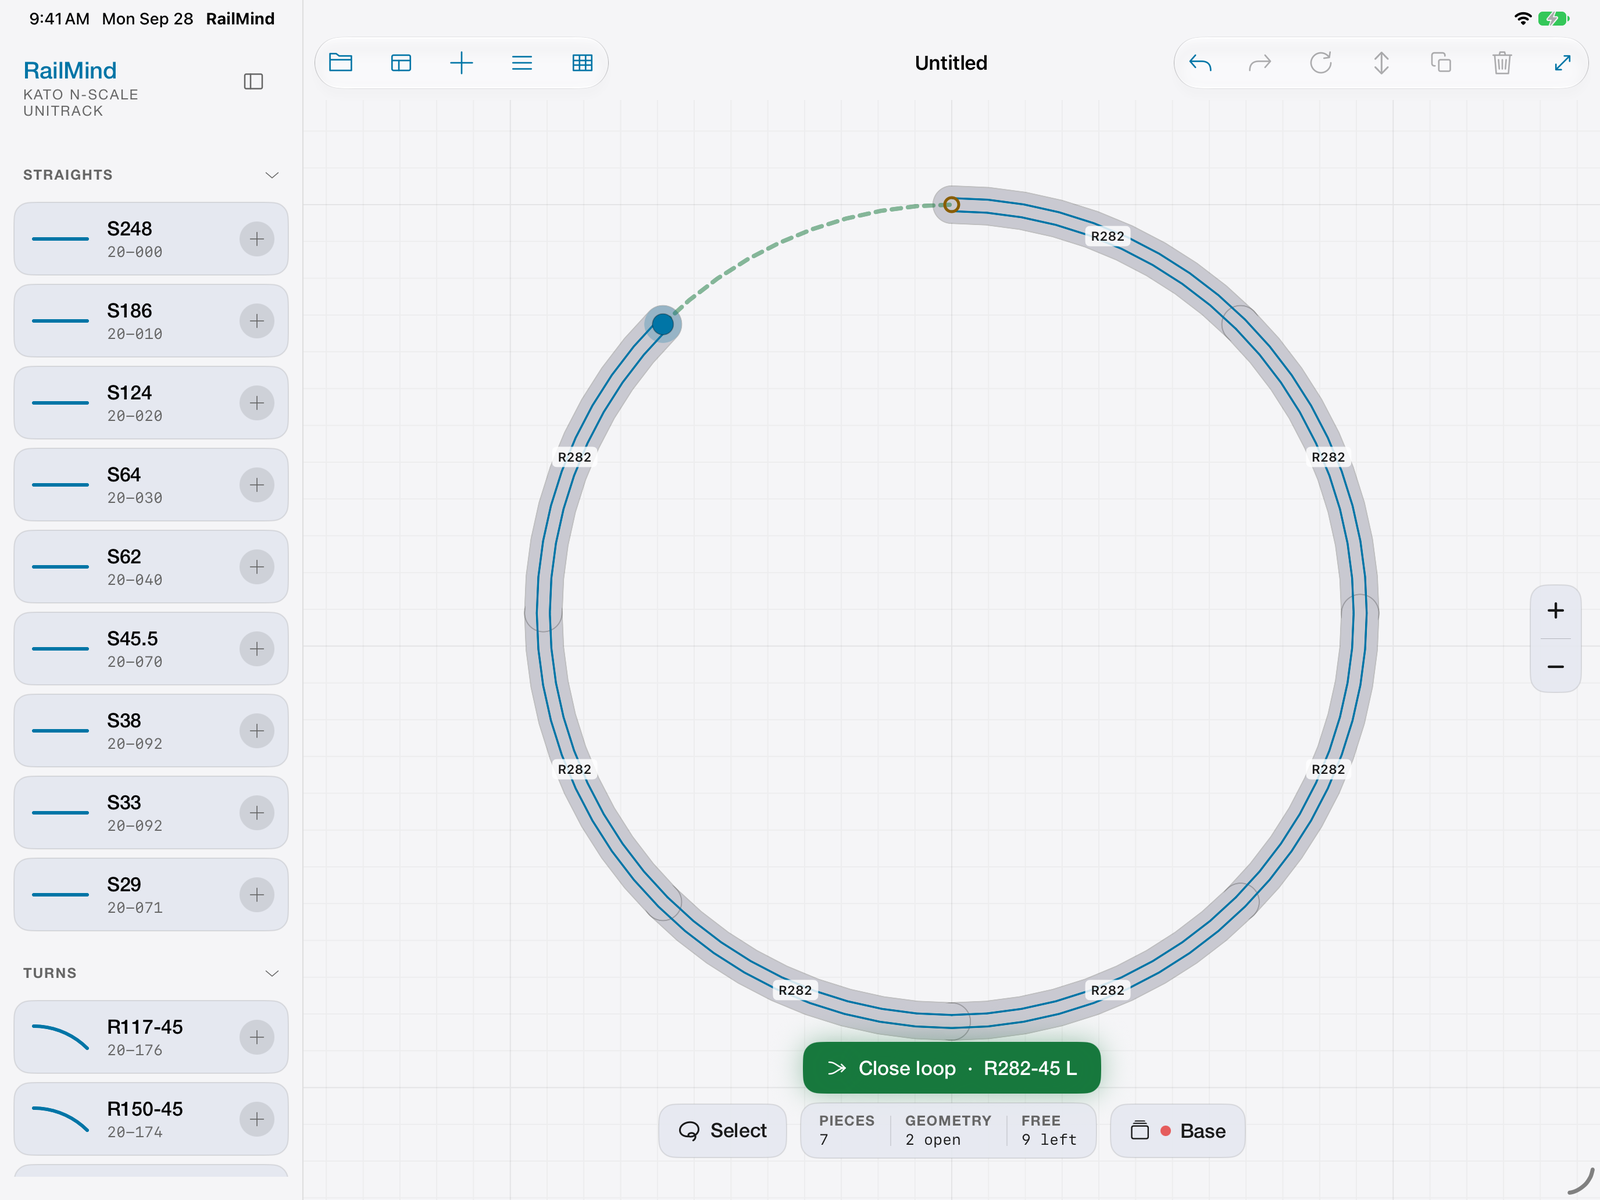
The same moment on a circle of curves: the blue dot is where the next piece goes, the dashed green curve is what Close loop will add, and FREE counts the free pieces you have left. - Curves turn right (clockwise) by default. To turn left, place one curve, then choose Flip L / R from the Copy menu (top right) or by pressing and holding the piece. Later curves follow the new direction.
- Made a mistake? Undo is the curved arrow at the top right. You never need to save; RailMind saves as you go.
Next: tap the Parts List icon to see exactly what to buy (section 11).
2. Find your way around the screen
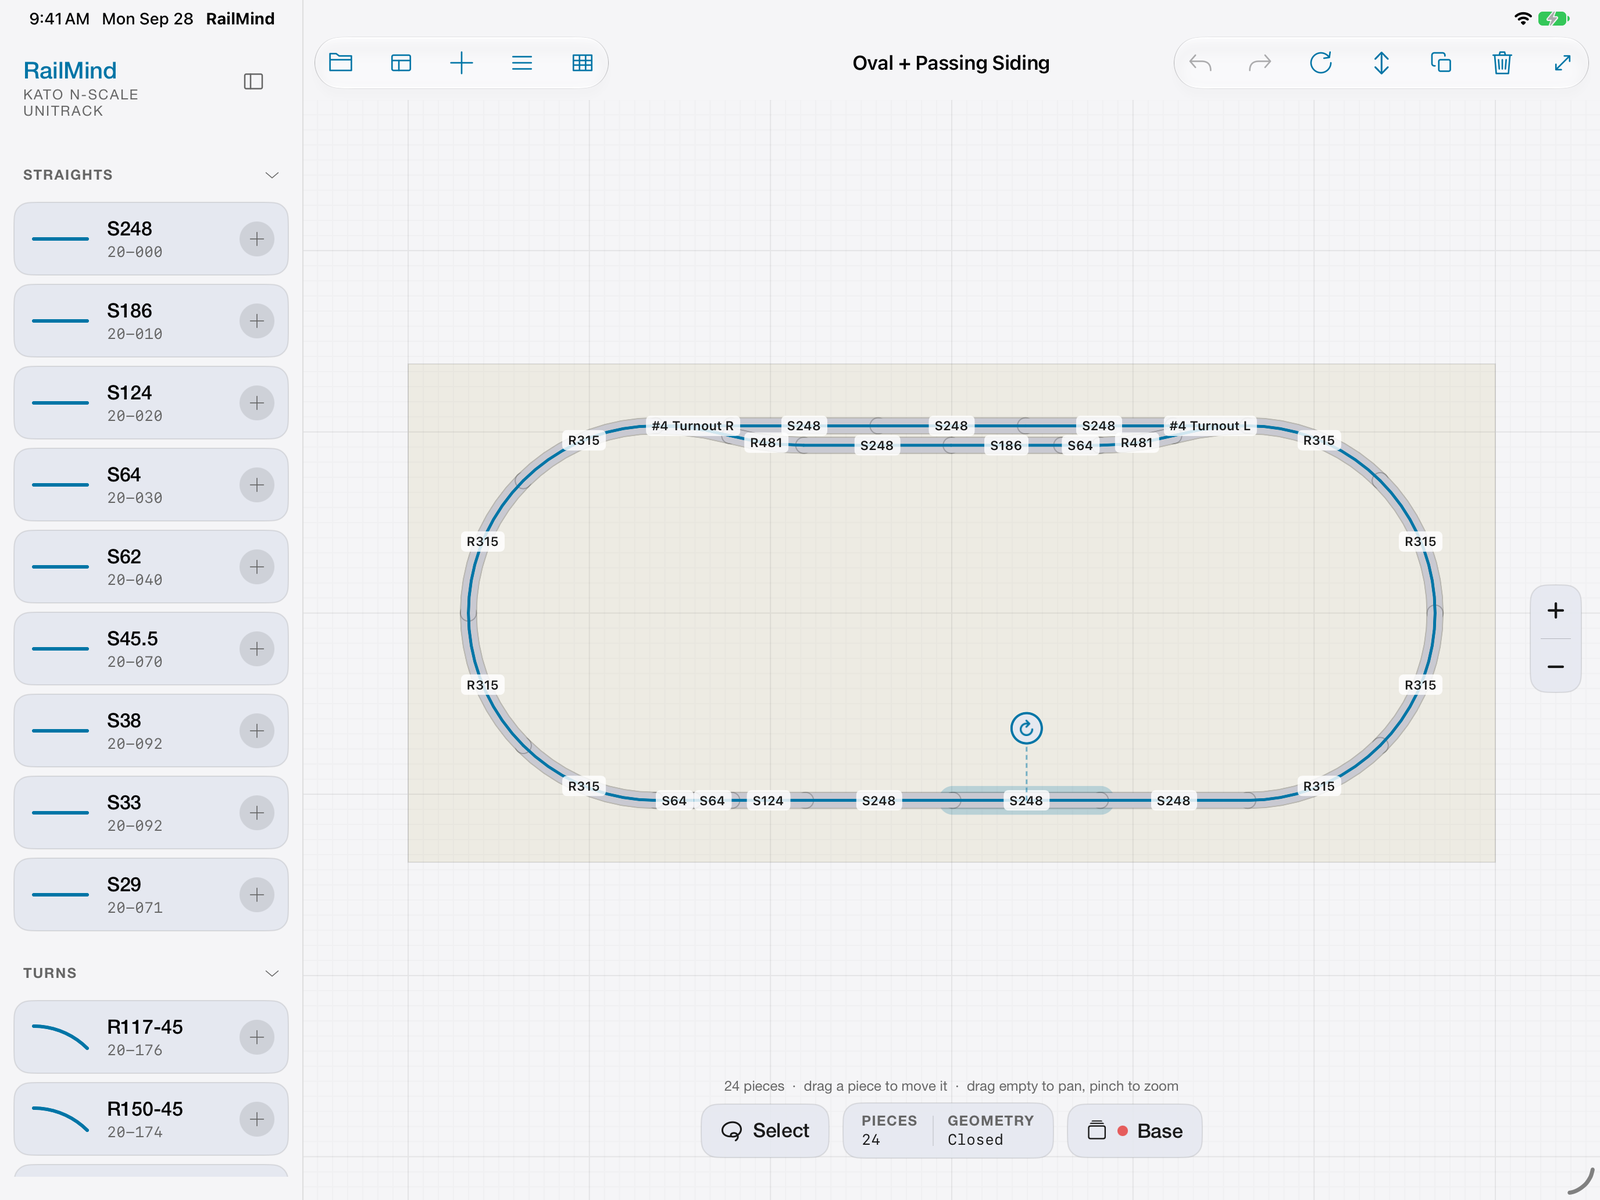
- Palette. Every Kato piece for the plan’s scale.
- Left toolbar. Plans, layout settings, boards, parts list and 3D.
- Right toolbar. Undo, redo and the tools for the selected piece.
- Select. Turns on Select mode for picking several pieces.
- Stats. PIECES and GEOMETRY, plus FREE in the free version (see the close-loop picture).
- Layers. The active layer; tap to manage layers.
- Zoom. + and − zoom in and out.
The palette
The palette sits on the left, headed KATO N-SCALE UNITRACK (or HO-SCALE). Its sections are STRAIGHTS, TURNS, SPECIALS, BRIDGES, DOUBLE TRACK and TURNTABLE; HO has no bridges, double track or turntable. Tap a section header to collapse or expand it. Each chip shows a small drawing, the piece name, the Kato part number and a +.
To hide the palette, tap the sidebar icon at its top right. To bring it back, tap Show Palette (the sidebar icon) at the top left of the toolbar. To dock it on the right, which suits a left-handed Apple Pencil grip, go to Layout › Display › Palette side.
The toolbar
The toolbar buttons are icons. Turn on Layout settings › Show menu names to put a short name under each one, and find a short Guide in the same sheet under Help and on the Plans screen. The names below are what VoiceOver reads for each one, from left to right.
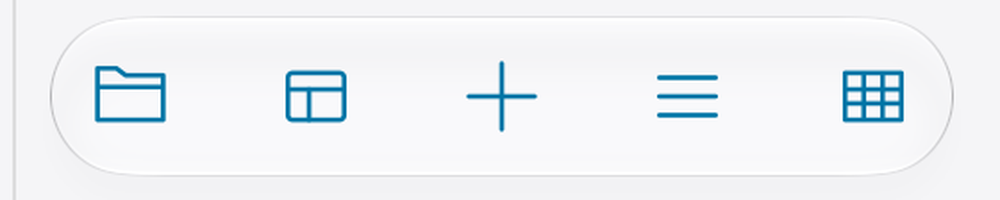
| # | VoiceOver name | What it does |
|---|---|---|
| 1 | Plans folder | Open, start, rename, share and back up plans (section 12). |
| 2 | Layout Settings | Opens the Layout sheet: scale, grid, display, boards, print and purchases. |
| 3 | Add Baseboard + | A menu of tabletop and T-TRAK board sizes, plus Custom board… (section 8). |
| 4 | Parts List | Your priced parts list and shopping list (section 11). |
| 5 | 3D View | Look at the layout in 3D (section 7). Gray until there is track. |
While the palette is hidden, Show Palette appears in front of these.
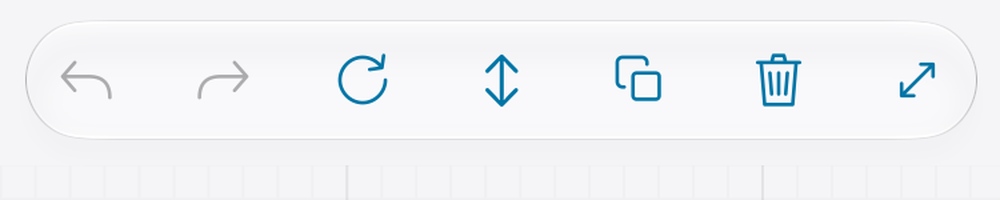
| # | VoiceOver name | What it does |
|---|---|---|
| 1 | Undo curved arrow | Steps back one edit. |
| 2 | Redo | Steps forward again. |
| 3 | Rotate | Turns the selection in 15°, 30° or 90° steps (section 4). |
| 4 | Elevation up/down arrows | Raises or lowers the selected piece. It reads Grade when you’ve boxed a run of track (section 7). |
| 5 | Copy, Paste, Duplicate | The Copy menu: Copy, Paste, Flip L / R and Parallel copy. |
| 6 | Delete Selection trash can | Deletes the selected piece or group. |
| 7 | Fit Layout to Screen | Fits the whole layout on screen. With something selected it reads Frame Selection and zooms to that instead. |
Rotate, Elevation and Delete stay gray until something is selected; Copy opens once something is selected or there’s something to paste. On an 11-inch iPad, some of the right-hand buttons move into a … menu.
The bottom bar
From left to right:
- Select (lasso): turns on Select mode (section 5).
- Stats: PIECES counts what you’ve placed. GEOMETRY reads — with no track, N mm gap when the active end is close to another open end, Closed when there are no loose ends, or N open for the number of loose ends. In the free version a third column reads FREE · N left (section 17).
- Layers: the active layer (section 9).
A hint line above the bar changes with what you’re doing.
Pan and zoom
- Drag empty canvas with one finger to pan. Pinch to zoom; moving both fingers while you pinch also pans, which is how you pan in Select mode.
- The + and − buttons on the right edge zoom in and out.
- If a piece seems lost, tap Fit, the last icon at the top right.
3. Lay and join track
Tap a chip to add that piece at the active end. You can also press and drag a chip onto the canvas: drop it close to an open end (within about 60 points) and it snaps on; drop it anywhere else and it sits where you let go. A piece from the other scale is refused.
What the dots on track ends mean
Every loose end of track has a dot, called a nub:
- Large glowing blue dot (cyan in dark mode): the active end, where the next piece goes.
- Green dot: another open end is within about 40 mm, so the two can join.
- Hollow amber ring: a loose end that isn’t lined up with anything yet.
- Neutral dot: a turntable stall.
Tap any nub to build from it instead.
Turnouts and sidings
Turnouts have separate L and R chips. After you add one, building carries on straight ahead. To build the siding, tap the turnout’s diverging nub and keep tapping pieces. A #4 or #6 turnout needs a reverse curve to reach parallel track; the note at the bottom of the palette gives the spacing (N: 33 mm for #4, 49.5 mm for #6; HO: 60 mm).
Moving a piece into place
Press a piece and drag it. When one of its ends nears an open end, a bright blue ring shows where it will snap; let go and it turns and clicks on. Dropped anywhere else, it stays where you put it, nudged onto a grid point if one is close and the grid is showing. Any ends that now line up join by themselves.
Tip When you open a saved plan, RailMind picks an open end for you. Tap the nub you actually want to build from.
4. Move, turn, flip and delete
- Select: tap a piece; it glows blue. Tap empty canvas to deselect.
- Rotate: tap Rotate for left and right buttons at 15°, 30° and 90°. The popover stays open, so you can tap repeatedly. You can also drag the round ↻ knob above the selection to spin it freely; it clicks onto the nearest 15° step when you’re within about 6° of one, and turns freely in between.
- Flip L / R: works on one curve or turnout at a time (not a group, and not HO’s #6 turnouts, which are a single molded piece), from the Copy menu or the press-and-hold menu. The piece stays attached, and a turnout swaps to its L or R part.
- Press and hold a piece for about half a second to open Edit piece: Copy, Paste, Duplicate, Flip L / R, Rotate 90°, Rotate 30°, Rotate 15° (these turn clockwise only), Delete and Cancel. Pressing and holding bare baseboard opens that board’s settings instead.
- Duplicate drops a copy 40 mm to the right of and 40 mm below the original, for you to drag into place.
- Copy menu (top right): Copy, Paste, Flip L / R and Parallel copy. Parallel copy lays a matching line alongside, with curves swapped for the matching radius. In N the spacings are 33 mm · double track, 49.5 mm · #6 spacing and 66 mm · wide; in HO, 60 mm · double track and 120 mm · wide.
- Delete: tap the trash icon or the Delete button that appears beside Select, or press and hold › Delete. To remove every piece, use Layout › Clear all track; it keeps your boards and can be undone.
- Undo and Redo go back up to 200 steps. With a keyboard, use ⌘Z and ⇧⌘Z. Opening another plan or changing scale starts a fresh history. Board sizes, grid unit and plan name aren’t undone (deleting a board is).
5. Work with several pieces at once
- Tap Select (the lasso, at the left end of the bottom bar). It turns blue and reads Done.
- Drag a box on empty canvas to select everything inside it. Tap pieces to add or remove them.
- Drag any selected piece to move the whole group. Rotate turns the group about its center, and the Copy menu (except Flip L / R) and trash act on the whole group. A group only snaps when one of its ends already faces the end you’re aiming for.
- Tap Done to leave Select mode.
Tip Do your group actions before you tap Done, because Done clears the group.
6. Close tricky gaps
Close loop
Close loop appears when the active end faces another open end within about 700 mm and a single piece or a run of straights closes the gap exactly. The button lists the pieces, for example Close loop · S248 + S62. A plain Close loop means the ends already touch but aren’t joined yet: tap it to join them.
Auto-route
For a gap up to about 1.2 m that Close loop can’t close, the button reads Auto-route this gap instead. Tap it to open a panel with:
- Curve radii your trains can run: tap the R-number chips to allow or exclude radii. ≥ R282 and All are quick presets.
- Max gap: a slider from 0 to 4 mm (2 mm to start).
- Use turnouts: lets a route branch through a turnout, leaving a siding stub.
The search runs for up to 30 seconds and lists up to five closures. Tap one to preview it, then tap Apply or Discard. The canvas is locked while the panel is open. If nothing fits, the app says so: “No closures with these settings — widen the max gap or allow more curve radii.”
In the free version, a gray Close loop · needs N more than the free tier button opens the unlock screen instead (section 17).
7. Add hills and see them in 3D
Raise one piece
Select a piece, tap Elevation (the up/down arrows) and use −10, −1, +1 or +10 mm. The popover shows the height and Grade: X.X%, and warns steep above 4%. The pieces on either side become the ramps.
A smooth slope over a run
- In Select mode, box a connected run of two or more pieces with no branches.
- The Elevation button now reads Grade. Tap it and set the heights for end A and end B. The whole run gets one even slope.
- Tap Done. The whole change is one undo step.
3D View
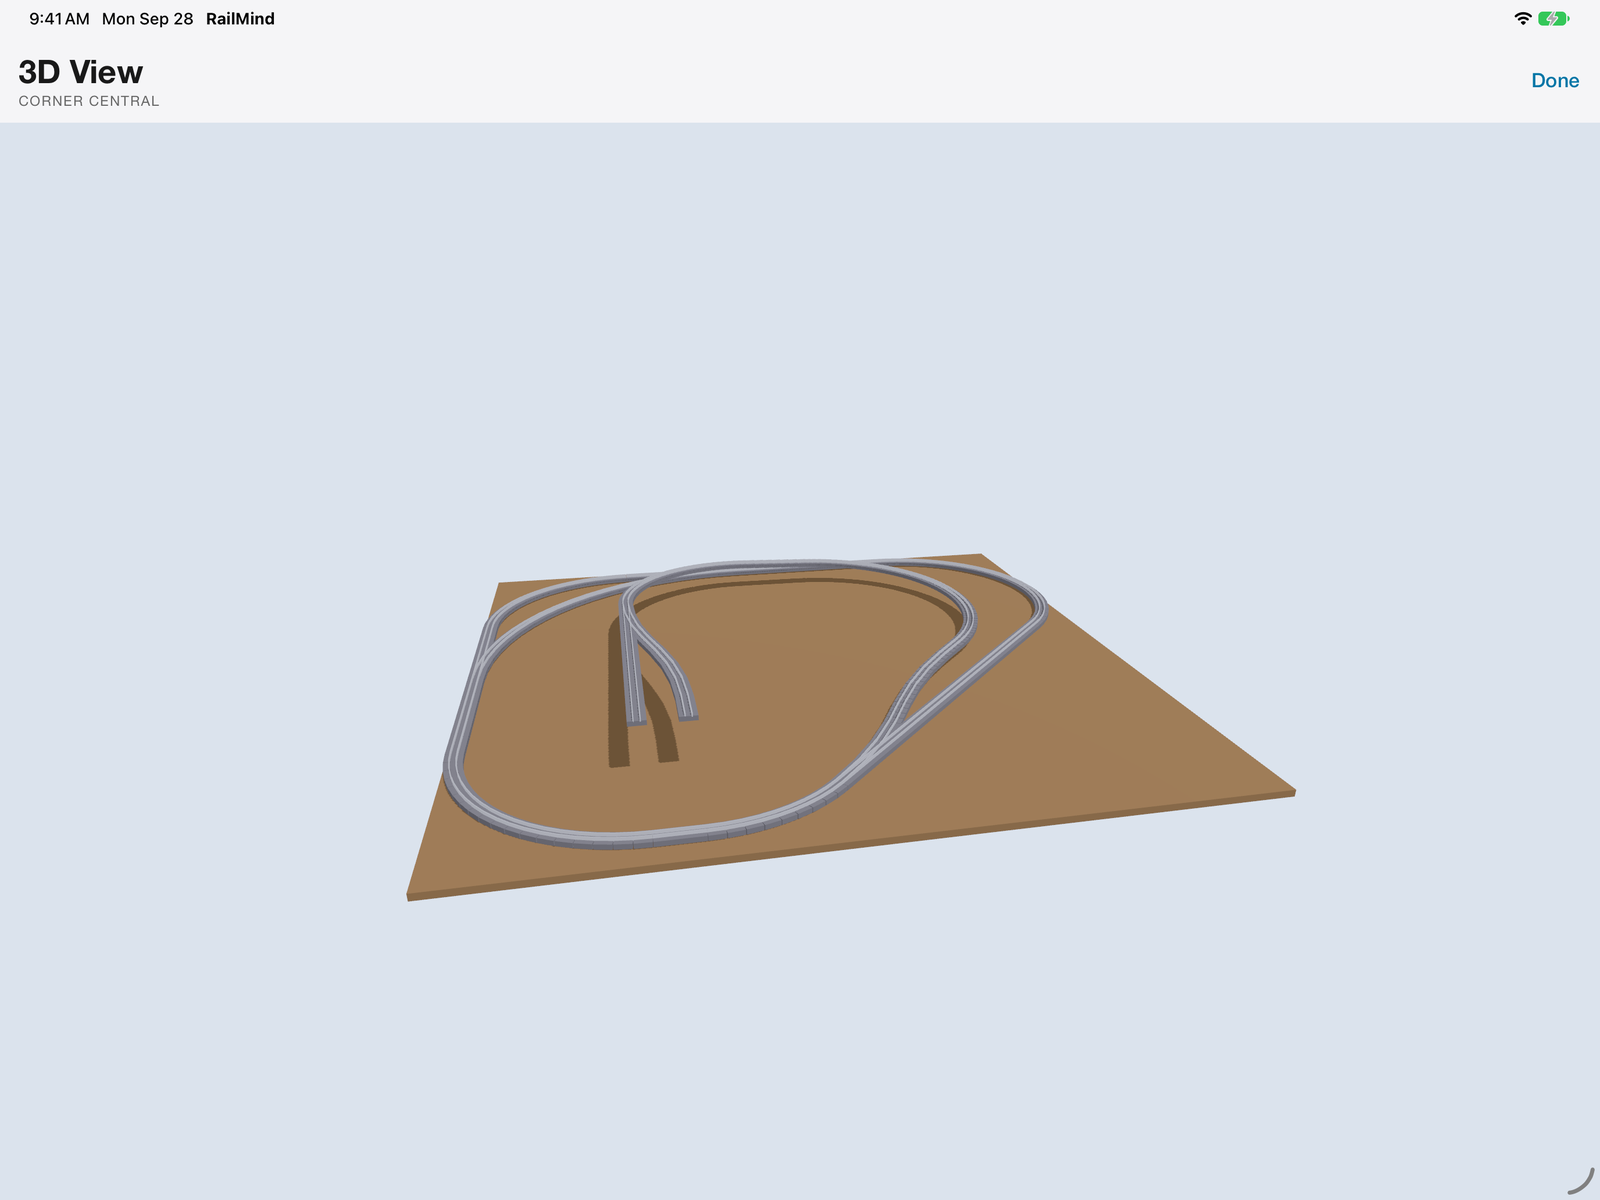
3D View is in the top-left toolbar and stays gray until there is track. Drag to orbit, pinch to zoom, drag with two fingers to pan, and tap Done to go back. It’s for looking only; you edit in 2D. It shows your boards even when they’re hidden on the canvas, and every layer.
8. Set up baseboards, grid and scale
Add a board
The + (Add Baseboard) menu has:
- Tabletop: 2 × 4 ft, 30 × 80 in Door, 4 × 8 ft.
- T-TRAK: Single, Double, Triple, Quad, Corner, Inside Corner, End Cap and Junction.
- Custom board…: opens the Layout sheet. Tap Custom Board there to add a 2 × 4 ft board, then set its size.
The first board is centered where your first piece lands. Later boards go below the ones you have, lined up on the left.
Resize, move or delete a board
You can’t drag or pinch a board; you type its size.
- Press and hold an empty part of a board (not on track, and not in Select mode). The Layout sheet opens with that board highlighted. You can also open it with Layout Settings.
- Scroll down to Your boards; the sheet doesn’t scroll there for you.
- Set X, Y, WIDTH and DEPTH. They’re in inches, or in feet when the grid unit is 1 ft, with the size in mm underneath. X and Y set the board’s top-left corner.
Boards can touch or overlap, which is how you make an L-shape. To delete a board, tap its trash icon or swipe the row; Undo brings it back.
Grid unit
Layout › Grid › Grid unit is 1 in, 1 ft or Kato 124 mm, saved with each plan. Track sizes always stay metric.
Scale
Layout › Scale is N scale or HO scale, set per plan. It locks once the plan has track, so start a new plan to build in the other scale.
Display
- Show baseboards (new in 1.2) hides every board on the canvas so you see only track. Print, the shared image and 3D still show boards, and adding a board turns the switch back on.
- Show piece labels: names such as R282 and S248 on the track.
- Show mm gaps: a dashed amber line marked N mm between facing ends 2–80 mm apart.
- Show roadbed and Color track by type.
- Baseboard color and Grid color, with Reset colors to default.
- Appearance and Palette side.
9. Use layers
Tap the Layers chip at the right end of the bottom bar.
- Add Layer creates a new layer, up to 10. Tap a name to rename it.
- Tap the circle beside a layer to make it active. New pieces go onto the active layer. With two or more layers, the palette header also gets a layer menu.
- The eye hides a layer on the canvas only. Its track still counts in the parts list and the loop check. Hidden layers are left off the 1:1 print, but 3D shows every layer.
- Move selection to <layer> moves the selected pieces onto the active layer.
- Tap Edit to reorder. Deleting a layer moves its track to the first layer; the track itself is never deleted.
10. Start from an example or a T-TRAK module
There are two ways in:
- Plans › Example layouts: tap a row and a new plan starts straight away. Your current plan is saved first.
- The grid button at the top left of Plans opens the full-screen gallery.
The free tier never blocks opening an example.
Examples follow the plan’s scale: there are 20 in N (one of them a T-TRAK club layout) and 7 in HO, four of those Kato’s own plans. To see the HO ones, make a new plan, switch Layout › Scale to HO scale, then open Example layouts.
T-TRAK modules
T-TRAK is N only. The gallery’s T-TRAK modules tab holds 19 modules: Straights (5), Corners (6), Crossovers (3), Sidings & spurs (4) and Junctions (1). If your plan already has track or a board, tapping a module asks: Add to this layout, Open as new plan or Cancel.
Add to this layout joins the module to your layout’s open module edge, front main to front main, using the end you tapped last. The module brings its own board. It turns only in 90° steps and won’t overlap an existing board. If nothing fits, it lands 100 mm to the right with its track selected, ready to drag; its board stays where it landed, so move the board in Layout Settings › Your boards (section 8). Building carries on from the module’s far end, so choose Add again to chain modules. One Undo removes a module and its board together. The whole module counts against the free limits.
Modules in your layout
A module stays a module: its board and track move, turn in 90° steps and delete together, and snap front main to front main as you drag. RailMind recognizes all 19 library modules exactly, at every quarter turn. Edit track opens a module up (tap Done to group it again), and Make module groups track on a board back into one. Save a module to My modules, share it as a file, and open a friend’s. Club Checks list a T-TRAK layout’s open mains, red and yellow swaps and corners that don’t close; tap one to jump to it, and it goes green when the loop closes.
Use RailMind 1.2 on every iPad
A plan with modules needs RailMind 1.2 to edit it. An iPad on an older RailMind can open the plan and sees all the track, but if it saves the plan, it drops which pieces belong to which module. RailMind 1.2 protects you from that:
- If an older iPad only opened the plan and sent it back unchanged, RailMind 1.2 notices and puts its full copy back. Nothing is lost.
- If an older iPad really changed the plan, RailMind 1.2 takes the change but keeps your own version first. A banner says Changed on an iPad with an older RailMind, with how many modules it re-grouped by itself and how many are loose. Tap Restore my version to bring yours back everywhere (Undo takes it back again), or Keep theirs.
- RailMind 1.2 re-groups every library module that is still exactly as it was added. A module whose track was changed stays as loose track.
Update every iPad you use for the same plans to RailMind 1.2, and these steps never come up. The same rule works the other way: a plan saved by a newer RailMind than yours opens view only. Tap the banner and choose Duplicate as editable copy; the copy leaves out anything your version can’t read, and the original stays as it is.
11. Get your parts and shopping list
The parts list
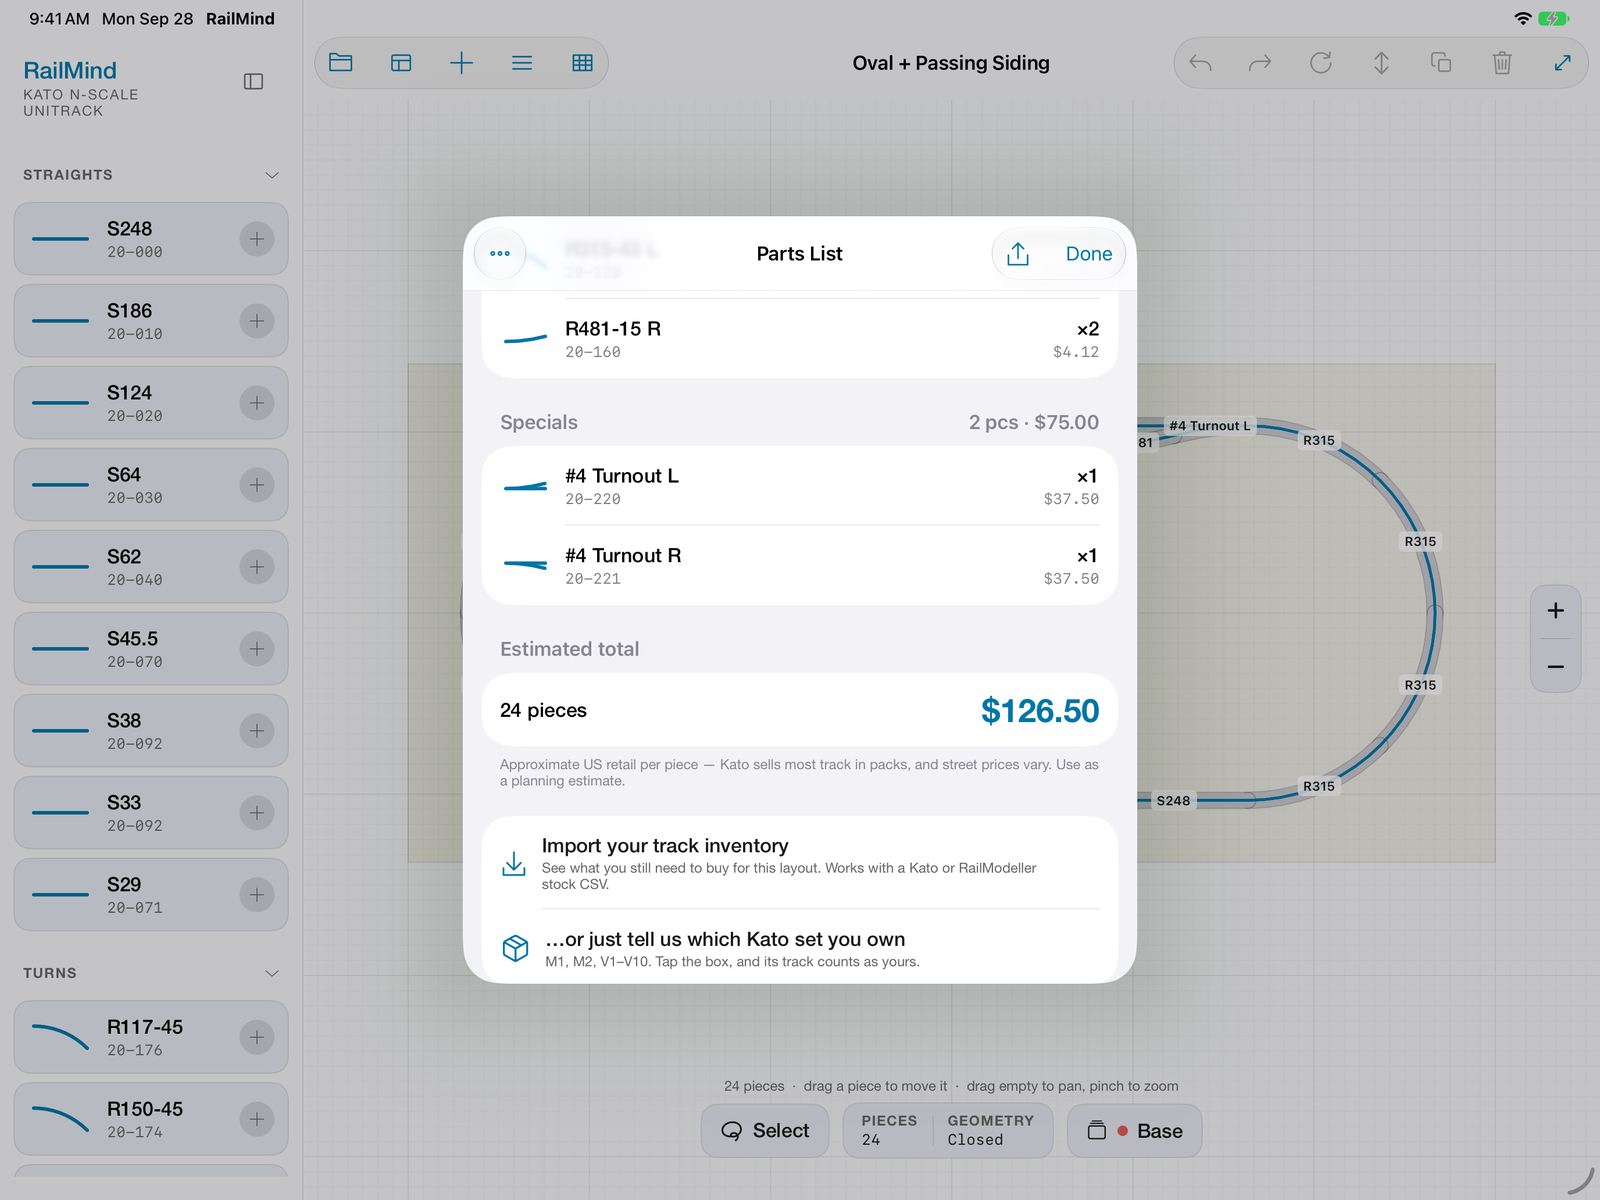
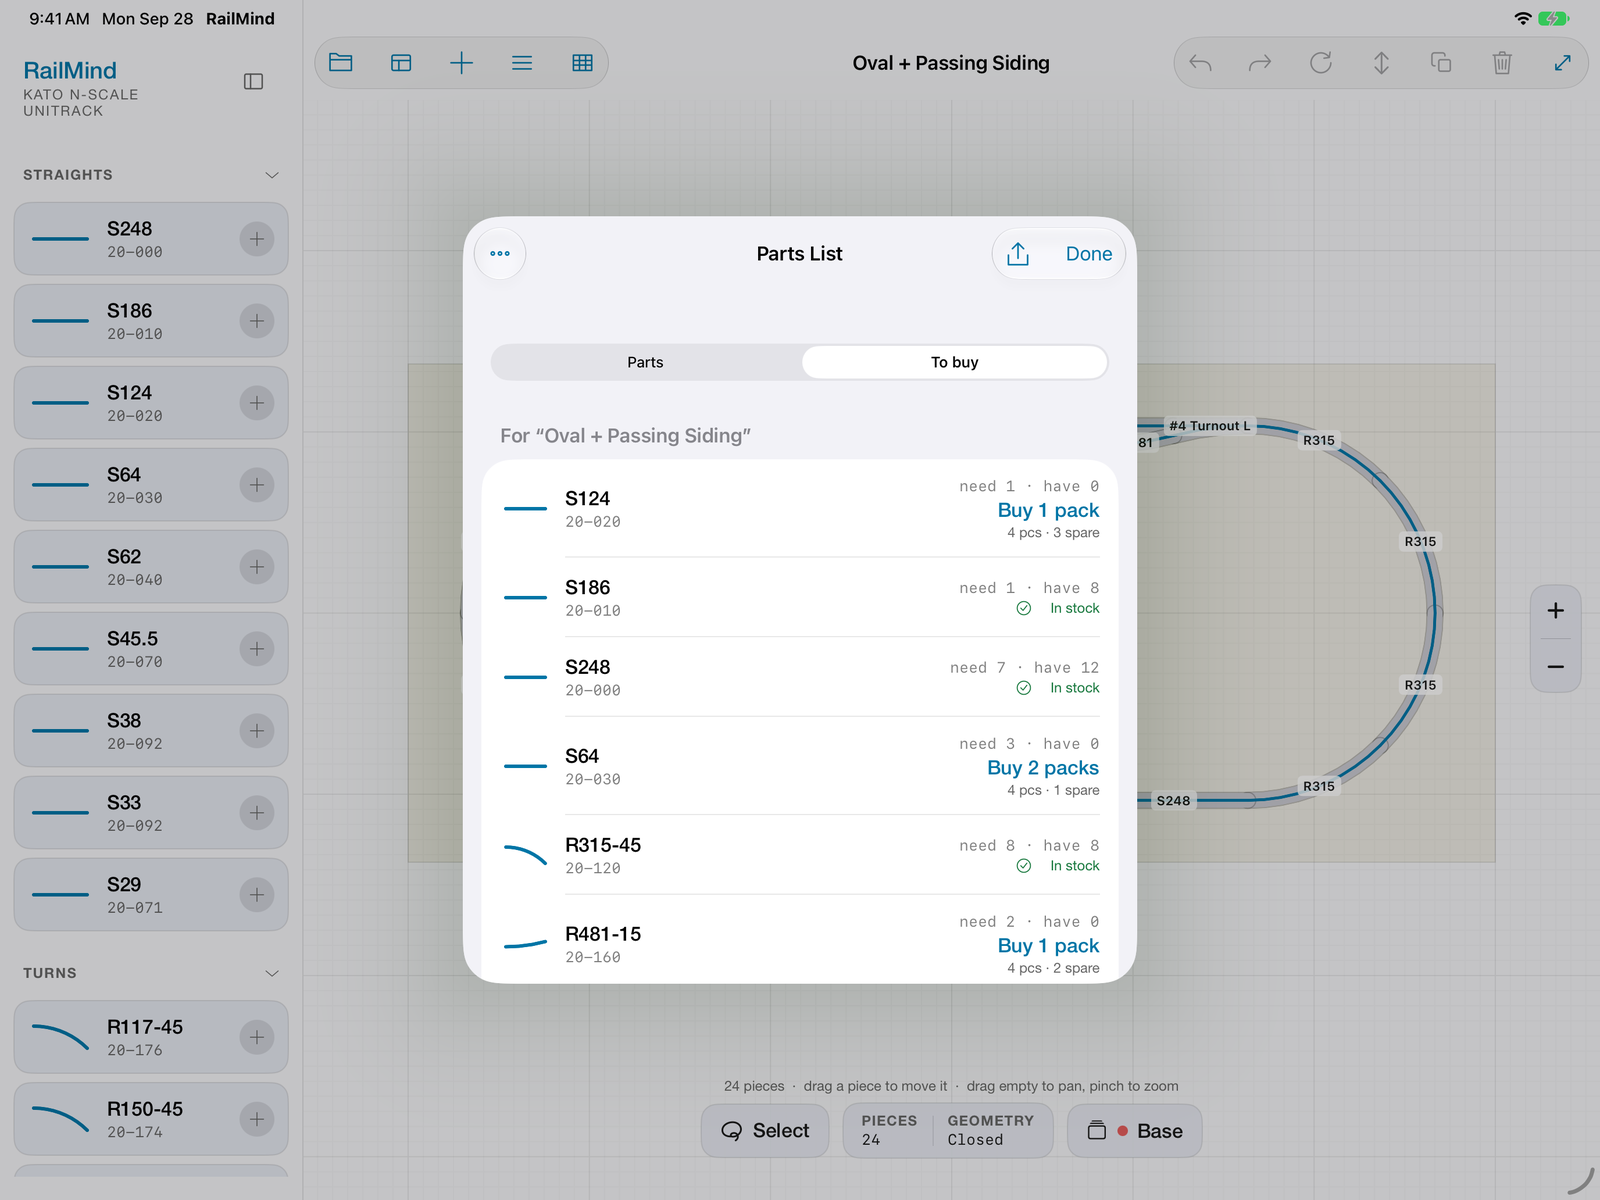
Tap the Parts List icon. Pieces are grouped by section, with Kato part numbers, counts, approximate US prices (always in US dollars) and an Estimated total. Kato sells most track in packs and street prices vary, so treat the total as an estimate.
Buy whole packs: tell RailMind what you own
For a shopping list rounded to whole Kato packs, first tell RailMind what track you already have. Tap the ••• (Inventory) menu at the top left of the Parts List:
- Import inventory… reads a Kato or RailModeller stock file (CSV, TSV or plain text, up to 4 MB). It replaces your saved inventory.
- Add a Kato set… lists M1, M2 and V1–V10. Tap a set to add its track; tap twice if you own two, and use − / + to fix a miscount.
Your inventory applies to every plan.
A Parts / To buy switch then appears. Each To buy line reads need N · have N, then In stock, Buy N pack(s) with N pcs · N spare, or Buy N for pieces sold singly. A Shopping summary sits at the bottom.
Share or export the list
The share icon at the top right offers Share as text or Export as CSV for whichever tab is on screen.
Price a list from another planner
Plans › Import › Paste a parts list…: paste a parts list from AnyRail, SCARM, RailModeller or any other planner, then tap Match parts. You get a priced list and a list of anything that didn’t match. It only prices the list; it doesn’t create a plan.
12. Manage your plans
Plans save automatically, about half a second after each edit, and RailMind reopens where you left off.
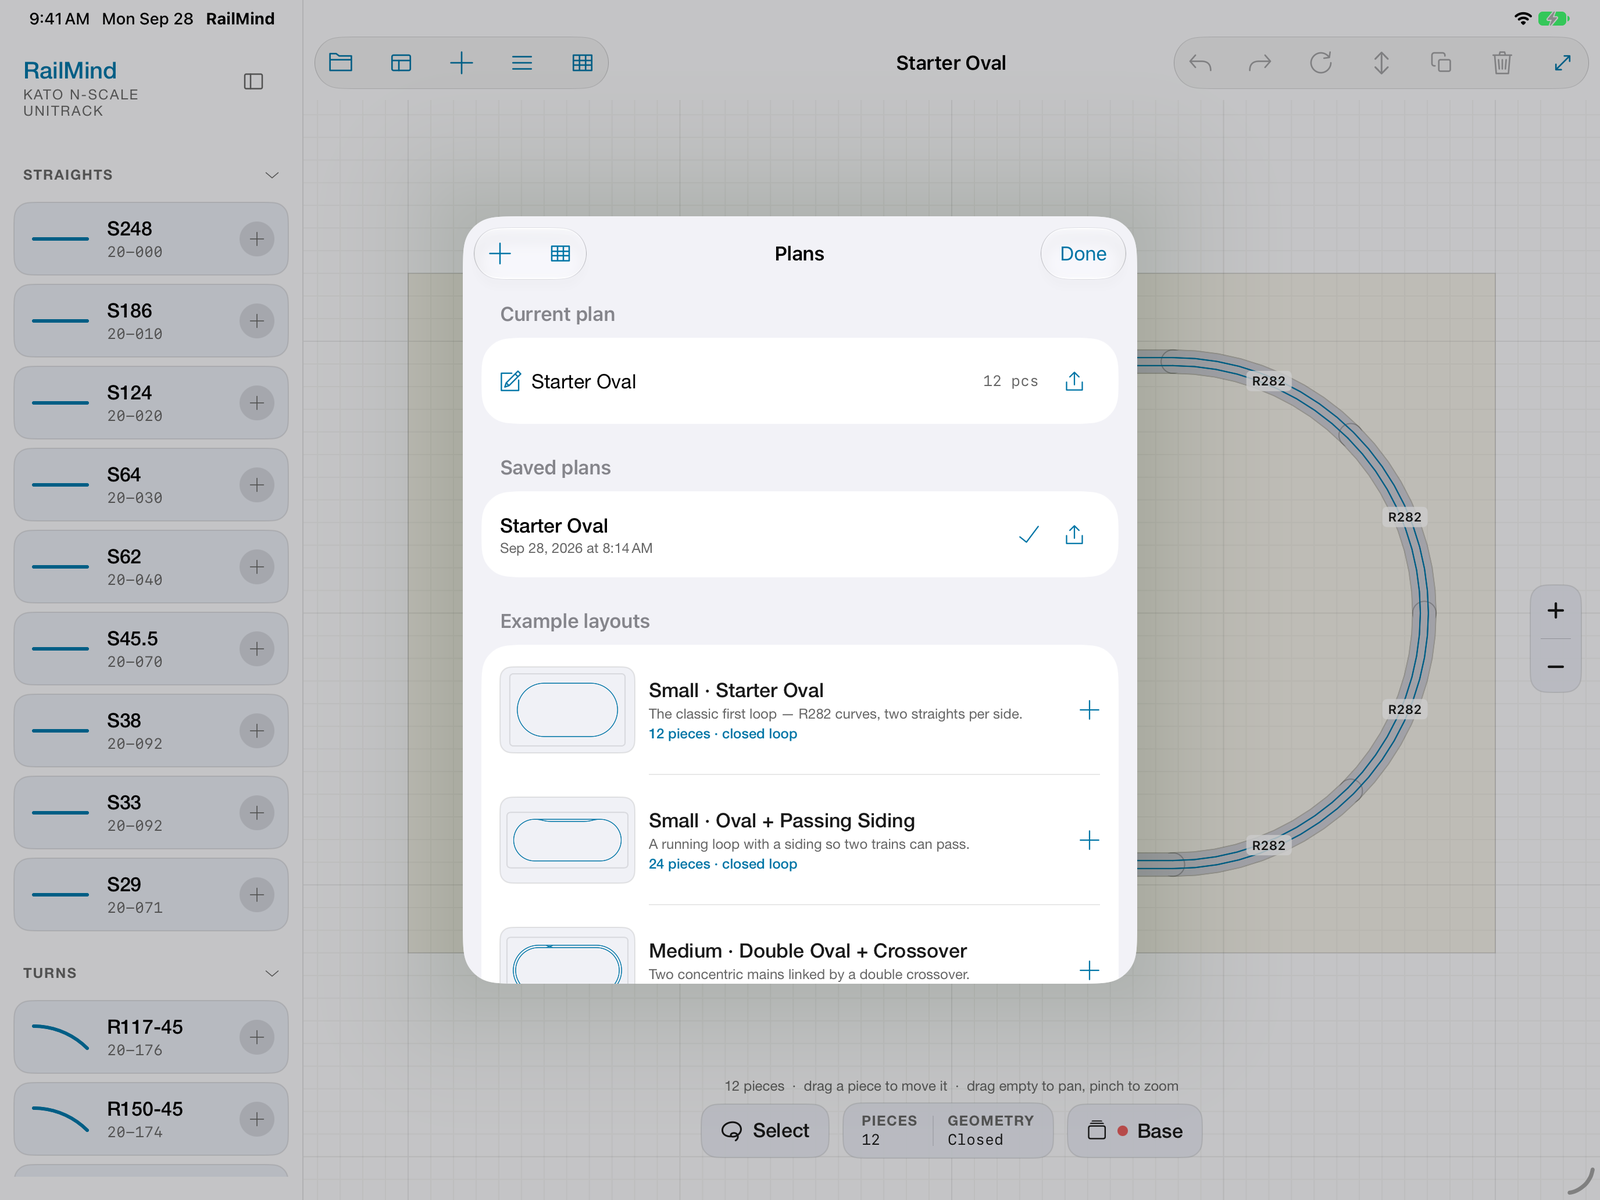
Tap the Plans folder icon:
- New plan: tap + at the top left. It starts as “Untitled” in N scale and offers you a board.
- Rename: type in the Plan name field. Only the open plan can be renamed, so open a plan first to rename it.
- Open: tap a saved plan. The open plan has a checkmark.
- Delete: swipe a plan left › Delete. It can’t be undone, and plans go one at a time.
- Share: the share icon on any plan offers Share plan file (a .railmind file that opens as a new plan on another iPad, never blocked by the free tier) or Share as image (a PNG picture of the plan).
- Replay the tour: scroll past the example list and tap How it works.
13. Back up and move to a new iPad
Automatic iCloud backup
Layout Settings › Backup › Back up plans to iCloud is on by default. It copies every saved plan to your own iCloud and brings it back on any iPad signed in to the same Apple Account, including after you delete and reinstall the app. Apple gives each app about 1 MB for this, however much iCloud storage you have. If it fills, a banner on the Plans screen says some plans are saved on this iPad only and asks you to save a backup file as well.
A backup file is a copy of every plan you can keep in Files. It brings your plans back after a reinstall, and it moves them all to another iPad in one go.
Save a backup file
- Open Plans and scroll to Back up & restore.
- Tap Back up all plans…. The share sheet opens with a file named RailMind-Plans-YYYY-MM-DD.json.
- Save it to Files or iCloud Drive.
Restore on a new iPad, or after reinstalling
- Install RailMind. After the tour, open Plans and scroll to Back up & restore.
- Tap Restore from backup… and pick the backup file.
Restored plans are added to your library and never overwrite anything; a plan with a clashing name gets a number, such as “Name 2”. Restore from backup… also accepts a single .railmind file.
To move just one plan, use Share plan file (section 12) and send it with AirDrop or Mail.
14. Print your plan at full size
- Tap Layout Settings, scroll to Print and tap Print layout (1:1). It stays gray until there is track.
- Choose US Letter or A4, and turn on Include piece labels if you want them. Pages shows how many pages it will take.
- Wait for Preparing PDF… to finish, then tap Export / Print… and choose Print, Save to Files or Mail.
- In the print dialog, turn off Fit to page / Scale to fit.
Measure the 100 mm ruler on a page to confirm it printed at 1:1. Pages overlap by 12 mm and are labeled “page n of N (row, col)”, so you can tape them together in order. The print includes board outlines and leaves out hidden layers.
A layout that would need more than 2000 pages won’t print; if you see that message, check your board sizes and grid unit.
15. Apple Pencil and keyboard
Apple Pencil works exactly like a finger; there is no separate drawing mode. On Apple Pencil Pro:
- Squeeze with a piece or group selected to open Edit piece.
- Squeeze with nothing selected to show or hide the palette.
- You feel a small haptic click as pieces snap together.
Squeeze follows the squeeze setting in your iPad’s Apple Pencil settings.
With a hardware keyboard, ⌘Z undoes and ⇧⌘Z redoes.
16. Accessibility
- VoiceOver: every piece and every open end is its own element. Double-tap a piece to select it; its actions are Rotate left and Rotate right (15° each), Flip and Delete. Double-tap an open end to make it the active end. An Open ends rotor jumps between loose ends, and RailMind announces “Placed. N pieces.” and “Loop closed.” The toolbar names are in the toolbar tables.
- Dynamic Type: text follows your iPad’s text size, including the labels on the canvas.
- Reduce Motion is respected, and the zoom buttons are 44-point targets.
17. Free version and unlocking
RailMind is a free download. The free limits apply to each plan:
- 16 standard pieces in N (20 in HO): straights, curves, feeders, rerailers, uncouplers, adapters and road crossings. The 16 N pieces are exactly Kato’s M1 set oval.
- 2 turnouts: #4, #6, compact and wye.
- 2 special pieces: crossings, the double crossover, bumpers, bridges, double track and the turntable.
Everything in this guide works in the free version, within the limits above. The unlock lifts those limits: unlimited pieces, and nothing else changes.
Moving, rotating and deleting never count. Examples and shared plans always open, but adding track to one that’s over the limits needs the unlock.
Going past a limit doesn’t add the piece. Instead, the Unlock RailMind screen opens, and your plan is saved either way. There is no Buy button anywhere else, and the screen never pops up at launch.
The unlock is a one-time purchase: US$29.99, shown in your own currency in the App Store. There’s no subscription and no ads.
Restore a purchase
Tap Layout Settings and, under Purchases, tap Restore Purchases (shown while the app is locked). Or tap Restore purchase on the Unlock RailMind screen. It works on any iPad signed in to the same Apple Account, and you’re never charged twice.
18. Questions and answers
I can’t find a button.
The toolbar icons have no words. The toolbar tables in section 2 name each one.
My track disappeared.
It’s probably just off screen. Tap Fit, the last icon at the top right, to bring the whole layout back into view.
Close loop won’t appear.
The two ends must face each other within about 700 mm, and the active end must be one of them. Tap the nub you want to close from, or use Auto-route for a bigger gap.
My curve goes the wrong way.
Select it and choose Flip L / R from the Copy menu or the press-and-hold menu. Later curves follow the new direction.
Can I switch a plan to HO?
Only while it has no track. Otherwise, start a new plan and set Layout › Scale to HO scale before you lay any track.
Where are the HO examples?
In an HO plan. Make a new plan, switch it to HO scale, then open Example layouts.
Do I need to save?
No. RailMind saves about half a second after every edit.
How do I move to a new iPad?
Does it need the internet?
No. It only goes online for the App Store and your own iCloud.
Is it a subscription?
No. The unlock is a one-time purchase.
I paid on another iPad.
Restore your purchase: Layout Settings › Purchases › Restore Purchases, or Restore purchase on the unlock screen. See section 17.
Does it drive trains?
No. RailMind is for planning your layout.
Where’s the version number?
At the bottom of the Layout sheet: tap Layout Settings and scroll to the end.
My print isn’t full size.
Turn off Fit to page / Scale to fit in the print dialog, then measure the 100 mm ruler on a page to check.
How do I get a refund?
Apple handles all App Store refunds; RailMind can’t issue them. Go to reportaproblem.apple.com, sign in, choose Request a refund and pick the RailMind purchase. Apple explains the steps in Request a refund for apps or content that you bought from Apple. If Apple approves it, RailMind goes back to the free version the next time it checks the App Store, and your plans stay. The app itself is free, so only the unlock is ever charged. Stuck rather than unhappy? Email us first and we’ll help you get started.
Still stuck? Email us
Send us a note and we’ll help. It speeds things up if you include:
- Your app version: tap Layout Settings and scroll to the bottom, where it reads like “v1.2.0 (build N · …)”.
- Your iPad model.
- What you tried, and what happened.